BCC Flicker Fixer

BCC Image Restoration

Flixer Fixer

Overview

BCC Flicker Fixeris a filter for eliminating flicker from source footage. It provides 3 different methods for removing flicker. The Frame****Analysismethod is intended for use with clips with flicker that is uniform throughout the frame, or at least uniform within a contiguous block of the frame – e.g. flicker that is caused by unintended shutter speed or aperture variations from frame to frame. The two Temporal****Smoothingmethods are intended for use with clips in which the flicker varies from pixel to pixel within the frame – e.g. a scene that is lit partly by natural light and partly by a flickering artificial light, however the Temporal options are most suitable for clips without fast moving objects.

The Frame****Analysismethod analyzes the whole frame, and is not suitable for clips where the flicker is limited to a small part of each frame unless that part can be encompassed by a sampling mask rectangle. If most of the frame is flickering and a small part is not, the Frame Analysis method will generally remove most (but not all) of the flicker, but is likely to add flicker to the non‐flickering part of the clip.  You can, however, use the Mask and key controls to isolate the non‐flickering part of the clip and prevent this flicker from being added.

The TemporalSmoothin****gmethod processes each pixel independently. If part of the image is flickering and part is not, you can usually get good results by processing the whole clip as long as there is minimal motion in the clip. The filter will produce some softening (since it works by smoothing) in the non-­‐flickering part of the image, and you can use the Matte controls to isolate this region and minimize the image softening.

We recommend rendering the filter in 16 bit or float, especially if the Temporal Smooth YCC method is used.


Parameter Controls

Presets and Common Controls

BCC filters come with a library of factory installed presets plus the ability to create your own custom presets and preview them with the BCC FX Browser™.

BCC filters also include common controls that configure global effect preferences and other host-specific effect settings.

For more information about working with presets and other common controls, Click Here.


Compare Mode

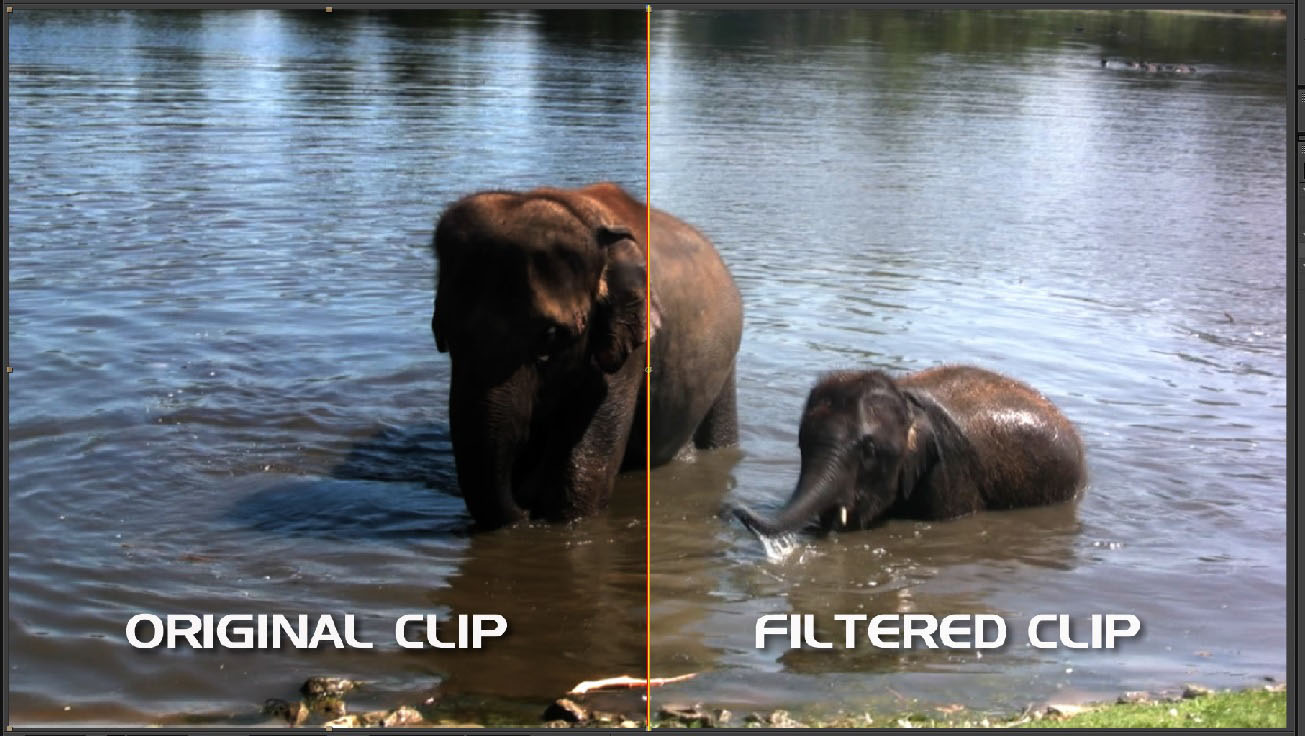
The BCC Compare Mode provides a convenient mechanism to compare the effect result with the original source layer. It provides several variations on basic split-screen views with the filtered clip placed next to the unedited original.

For more information on the Compare Mode,Click Here.


Method****popupThis control sets the method used by the filter to remove flicker. There are three options:

  • Frame Analysis analyzes the color range of each frame, and adjusts each pixel based on the difference between the RGB color range of the current frame and the average range of the surrounding frames. This generally works well if the flicker is uniform over the whole image.  The Frame****Analysismethod always analyzes the whole frame, and is not suitable for clips where the flicker is limited to a small part of each frame. If most of the frame is flickering and a small part is not, the Frame Analysis method will generally remove most (but not all) of the flicker, but is likely to add flicker to the non‐flickering part of the clip.  You can use the Limit****Sampling controls to isolate the analysis phase to just a sub-portion of the image.  Furthermore, you can use the Mask and key controls to isolate non‐flickering part of the clip and prevent the average flicker correction from being added.
  • Temporal  Smooth  RGBand Temporal  Smooth  YCC compute  a weighted average  of each pixel with the same pixel at surrounding  frames. The filter assess that the flicker is producing small frame-­‐to-­‐ frame changes in color, so pixels that are close in color to the pixel in the current frame get more weight than pixels that are further away in color. This causes small changes  caused by flicker to be averaged  out, while large changes  caused  by action are left alone. The averaging can be done in either RGB or YCC color space. RGB is faster, and the results are pretty similar, so we suggest you start with RGB. In some cases you may get better results in YCC, especially  if only the Y is flickering.  The TemporalSmoothin****gmethod processes each pixel independently. If part of the image is flickering and part is not, you can usually get good results by processing the whole clip. The filter will produce some softening (since it works by smoothing) in the non-­‐flickering part of the image, and you cause the Matte controls to isolate this region and prevent any image softening.


Frame Analysis Group

These controls are active when the Frame Analysis method is selected

**TimeWin****dow:**This is the number of frames considered by the filter during flicker removal analysis. You may need to increase this for slow flicker, and may be able to save a little render time by reducing this for fast flicker. Increasing the value in this parameter increases render time.

**TimeWindowCutoff:**This controls how far the analysis extends along the clip. Increasing the value in this parameter increases render time.

**Faster****Analysis:**You can achieve some speedup of the analysis by checking this control, and it has little discernible effect on the render quality.

**Smoothing:**Increase the value in this parameter if the image flicker is very rapid. Increasing the value in this parameter increases render time.

ResetCachebutton**:**You can usually ignore this button, but you need to hit it whenever you make a change to the layer to which the filter is applied.

You donotneed to hit this button if you slide the effect in the timeline, or change any filter applied after Flicker Fixer.

**LimitSamplingbutton:**Flicker can sometime be apparent in only a portion of the image – use this button to instruct the filter to limit image analysis to the region encompassed by the top left and bottom right sampling box.

**SamplingTop-­Left/****Bot-­Right:**Used to set the region sample box.

**View:**Used to set the filter output and includes the following four options:

  • Output– displays the filtered result
  • Transform Over Output– displays flicker curve over the filtered result
  • Transform Over Input– displays the flicker curve over the input clip
  • Transform Over Black– displays the flicker curve over black


**Temporal Smoothing Group:**These controls are active when one of the Temporal Smoothing methods is selected.

**Smoothing:**The amount of smoothing, in frames. Increasing this beyond 2 or 3 times the Max Frames setting will have little effect.

**Color****Range:**This is a master control that scales the range for the 3 color channels.

For each channel, the color range determines which pixels at neighboring frames are considered flickering versions of the current pixel.

**Max****Frames:**The maximum number of frames that the filter will look at on each side of the current frame. Increasing this value increases render time.

Red,Green,Blue**,****Y,Cb,CrRange:**Each of these (scaled by the Color Range) sets the range for the specific channel as described under Color Range. Only the 3 that are relevant to the current method setting are active. Note that Cb and Cr ranges default to their minimum value, since we expect most of the flicker to be in Y.

SmoothByFields****checkbox: This setting affects final render in fielded projects. Turning it on causes the smoothing to include each surrounding field instead of each frame. Enabling this option increases render time and adds some image softening, but can be necessary if the flicker is very rapid.

**MixWithOriginal:**Use to blend the filtered result with the original unfiltered input clip.


Matte****Group

Use the controls in this group to create a static or animated matte, which is then used to limit the flicker removal to the selected areas of the image.

The generated matte can be any combination of masked regions created via the built-in mask tools within the filter (or in After Effects from any layer mask) along with pixels, which have selected via the key group by the user from the input image.

Rende****rmode pop-up: This popup interacts with the Maskand Ke****ycontrols and determines the rendered output of the filter. The Mask and Key controls can be used to create a matte that separates the image into Insideand Outsidepixels. The following options are available in this pop-up:

  • Render with Matte**:**Uses the inside settings to render pixels inside the   matte (pixels that are both inside the mask and keyed in), and the outside settings to render pixels that are outside the matte.
  • Ignore Matte: The matte is ignored completely.
  • View Matte: The Matte is rendered as a black and white image.
  • Mask Inside Pixels: The source is rendered with a ruby mask over the pixels that are inside the matte.
  • Mask Outside Pixels: The source is rendered with a ruby mask over the pixels that are outside the matte.
  • Make Alpha from Matte: Makes an alpha channel from the matte. This is composited with the image’s original alpha channel.
  • Make Alpha from Inverse Matte: Makes an alpha channel from the inverted matte. This is composited with the image’s original alpha channel.
  • Show Source: Displays the unfiltered and unmasked original input clip.

MattePreviewColor****picker: Used to set the color of the mask overlay

Mask****Shape pop-up: Used to select the shape of the mask that is used to contain the inside and outside correction. On-screen control widgets have been provided for the Egg Shape masks. The available on-screen controls for these mask shapes enable you to modify the position and scale of the mask as well as the feather amount, feather bias, and egg shape.

  • Off: No mask is used and only the Inside Color Correction parameters will affect the image result.
  • Rectangle: Generates a rectangular mask
  • Rounded Rectangle: Generates a rectangular mask
  • Egg Shape: Generates an egg shape mask (good for human faces)
  • Host Layer: Uses luma or alpha values from a user selected source clip


Mask****Group

Contains parameters pertaining to the mask that is used to separate the inside and outside correction.

  • Host Layer pop-­up*:***Displays a list all of the available layers in the host timeline.
  • Host Channel pop-­up: used to select the host layer luma or alpha channel or their inverts.
    • Lum****a: Uses the selected host layer Luma channel.
    • Alph****a: Uses the selected host layer Alpha channel.
    • LumaIn****v: Uses the selected host layer Inverted Luma channel.
    • AlphaIn****v: Uses the selected host layer Inverted Alpha channel.
  • Host Mask pop-­up: Displays a list of available host generated closed spline mask shapes.
  • Host Mask Offset: Used to offset the position of the selected host mask shape.
  • Point 1: Used to control the position of the top of the mask shape.
  • Point 2: Used to control the position of the bottom of the mask shape.
  • Width: Used to control the width of the mask shape.
  • Scale: Used to transform scale the mask shape.
  • Egg Shape: Used to control the mask egg shape. Negative values produce a downward pointing egg shape, positive values produce an upward pointing egg shape.
  • Feather: Used to control the softness (feather) of the mask edge.
  • Feather Bias: Used to position the feather inside or outside of the mask shape bounds.
  • *Mask Gamma:*Used to adjust the falloff of the mask feathering.
  • Invert: Used to invert the mask.

KeyModepop**-­u****p**: Controls the state of the key matte function.

  • Off: Key matte function is disabled.
  • On: Enables the key matte function.
  • Invert: inverts the generated key matte.

MaskKeyCombinepop-­up: contains options for combining the mask shape and the key matte.

  • Multiply: Multiplies the key matte with the mask shape (removes pixels from the mask).
  • Screen: Screens the key matte over the mask shape (adds pixels to the mask).


KeyGrou****p

Contains parameters that are used in the generation of key mattes to isolate secondary colors for correction.

  • Base Key On pop-­up: Used to set the color space in which the keying is done.

    • HSV: Hue, Saturation, Luminance.
    • HSL: Hue, Saturation, Value.
    • HI****S: Hue, Saturation, Interpreted.
    • HSP: Hue, Saturation, Perceptual.
      • Note: Setting the Base Key On pop-up to HSP provides the greatest tonal range of all the available options but it less bright than the HSL default.
  • Key Softness pop-­up: Controls how the softness controls interact with the key.

  • Expand Key: Increasing the softness controls expand the key when this is selected.

  • Contract Key: Increasing the softness controls contract the key when this is selected

  • Soften Key: Increasing the softness controls softens the key when this is selected.

  • Key Color swatch and eyedropper: Used to select a color from the image that will be matched in the selected color space.

  • Note: If you choose a pure grey no hue matching will be done.
  • Hue Threshold: Used to control how close each pixels hue value needs to be to the selected Key Color to be treated as within the key.
  • Hue Softness: Used to soften the key in the hue channel.
  • Sat. Threshold: Used to control how close each pixels saturation value needs to be to the selected Key Color to be treated as within the key.
  • Sat. Softness: Used to soften the key in the saturation channel.
  • Lightness Threshold: Used to control how close each pixels lightness value needs to be to the selected Key Color to be treated as within the key.
  • Lightness Softness: Used to soften the key in the lightness channel.
  • Blur Key: Used to apply a blur to the key.
    • Note: Use of the Blur Key function can increase render times.


Motion Tracker

The BCC Motion Tracker allows you to track the motion of an object, then use the motion path to drive other geometric properties of the effect without the need for keyframing.

For more information on the Motion Tracker, Click Here.

The trackers in this filter have some additional controls:

Appl****yhas three choices.

  • Off*:***ignores the tracker data
  • Mask Points*:***applies each tracker to the corresponding mask points
  • Host Mask Offset**:**applies data from Tracker 1 to the host mask.

Loc****k **Tracker1and2:**lock each tracker. If you have successfully tracked one point, and are still working on the other, you can lock the completed tracker to save time and avoid changing its data.

Each tracker has a group for controls that can be set independently for the trackers. You would normally set tracker 1 to the point at the start of your clip where you want Point 1 of the mask to be, and tracker 2 where you want Point 2. You would then track and set Apply to Mask Points

There will be times when the points that you are able to track do not correspond to the end points of the desired mask. There are two ways that you can deal with this. You can attempt to adjust the mask controls (e.g. Feather, Feather Bias, and Scale) to find settings that produce the desired result, or you can edit the Offset X and Offset Y controls for each point to offset the Mask Points from the tracked result. These  offset controls can be animated if needed.


Category:

BCC Particles

BCC Color & Tone

BCC Perspective

BCC Perspective

BCC Licensing

BCC Obsolete

BCC Key & Blend

BCC Obsolete

Nested Subgroup

BCC Art Looks

BCC Licensing

BCC Time

Nested Subgroup

BCC Image Restoration

BCC Transitions

BCC Blur & Sharpen

BCC Transitions

BCC Obsolete

BCC Textures

BCC Color & Tone

BCC Image Restoration

BCC Warp

BCC Art Looks

BCC Transitions

BCC Art Looks

BCC Art Looks

BCC Stylize

BCC Textures

BCC Art Looks

BCC Transitions

BCC Key & Blend

BCC Key & Blend

BCC Textures

BCC Textures

BCC Color & Tone

BCC Stylize

BCC Color & Tone

BCC Color & Tone

BCC Obsolete

BCC Color & Tone

BCC Stylize

BCC Transitions

BCC Particles

Uncategorized

Uncategorized

Nested Subgroup

BCC Key & Blend

BCC Key & Blend

BCC Transitions

BCC Match Move

BCC Match Move

BCC Color & Tone

BCC Transitions

BCC Transitions

BCC Transitions

BCC Transitions

BCC Transitions

BCC Perspective

BCC Warp

BCC Transitions

BCC Perspective

BCC Stylize

BCC Transitions

BCC Obsolete

BCC Film Style

BCC Obsolete

BCC Blur & Sharpen

BCC Warp

BCC Stylize

BCC Image Restoration

BCC Image Restoration

BCC Image Restoration

BCC Perspective

BCC Perspective

BCC Key & Blend

BCC Stylize

BCC Lights

Uncategorized

BCC Stylize

BCC 3D Objects

BCC 3D Objects

BCC 3D Objects

BCC Film Style

BCC Transitions

BCC Film Style

BCC Perspective

BCC Blur & Sharpen

BCC Film Style

BCC Obsolete

BCC Obsolete

BCC Film Style

BCC Obsolete

BCC Obsolete

BCC Image Restoration

BCC Transitions

BCC Textures

BCC Browser

BCC Blur & Sharpen

BCC Lights

BCC Lights

BCC Lights

BCC Stylize

BCC Obsolete

Nested Subgroup

BCC Textures

BCC Transitions

BCC Stylize

BCC Art Looks

BCC Color & Tone

BCC Color & Tone

BCC Time

BCC Time

BCC Transitions

BCC Lights

BCC 3D Objects

BCC Stylize

BCC Obsolete

BCC Transitions

BCC Image Restoration

BCC Transitions

BCC Lights

BCC Obsolete

BCC Transitions

BCC Transitions

BCC Transitions

BCC Transitions

BCC Blur & Sharpen

BCC Obsolete

BCC Color & Tone

BCC Lights

BCC Transitions

BCC Obsolete

BCC Lights

BCC Transitions

BCC Key & Blend

BCC Obsolete

BCC Lights

BCC Key & Blend

BCC Key & Blend

BCC Transitions

BCC Time

BCC Image Restoration

BCC Key & Blend

BCC Film Style

BCC Match Move

BCC Key & Blend

BCC Key & Blend

BCC Art Looks

BCC Stylize

BCC Textures

BCC Warp

BCC Stylize

BCC Blur & Sharpen

BCC Image Restoration

Nested Subgroup

Nested Subgroup

Nested Subgroup

Nested Subgroup

Nested Subgroup

Nested Subgroup

Nested Subgroup

Nested Subgroup

Nested Subgroup

BCC Stylize

BCC Transitions

BCC Transitions

BCC Color & Tone

BCC Obsolete

BCC Textures

BCC Image Restoration

BCC Time

BCC Image Restoration

BCC Particles

Uncategorized

Uncategorized

Uncategorized

Uncategorized

BCC Perspective

BCC Perspective

BCC Particles

BCC Particles

BCC Particles

BCC Transitions

BCC Particles

BCC Art Looks

BCC Particles

Nested Subgroup

Nested Subgroup

BCC Image Restoration

Nested Subgroup

BCC Warp

BCC Art Looks

BCC Time

BCC Key & Blend

BCC Key & Blend

BCC Stylize

BCC Transitions

BCC Blur & Sharpen

BCC Blur & Sharpen

BCC Transitions

BCC Particles

BCC Lights

BCC Transitions

BCC Lights

BCC Lights

BCC Lights

BCC Lights

BCC Lights

BCC Lights

BCC Lights

BCC Lights

BCC Transitions

BCC Stylize

BCC Image Restoration

BCC Image Restoration

BCC Textures

BCC Lights

BCC Key & Blend

BCC Transitions

BCC Transitions

BCC Stylize

BCC Stylize

BCC Transitions

BCC Transitions

BCC Warp

BCC Transitions

BCC Textures

BCC Obsolete

BCC Color & Tone

BCC Stylize

BCC Stylize

BCC Obsolete

BCC Image Restoration

BCC Particles

BCC Particles

BCC Perspective

BCC Transitions

BCC Key & Blend

BCC Transitions

BCC Blur & Sharpen

BCC Lights

BCC Art Looks

BCC Lights

BCC Obsolete

BCC Textures

BCC Textures

BCC Obsolete

BCC Transitions

BCC Time

BCC Transitions

BCC Art Looks

BCC Transitions

BCC Time

BCC 3D Objects

BCC Time

BCC Time

BCC Color & Tone

BCC Transitions

BCC Warp

BCC Warp

BCC Transitions

BCC Film Style

BCC Key & Blend

BCC 3D Objects

BCC Blur & Sharpen

BCC Image Restoration

Uncategorized

BCC Transitions

BCC Warp

BCC Textures

BCC Time

BCC Stylize

BCC Warp

BCC Color & Tone

BCC Film Style

BCC Transitions

BCC VR

BCC VR

BCC VR

BCC VR

BCC VR

BCC Warp

BCC Art Looks

BCC Transitions

BCC Warp

BCC Textures

BCC Particles

BCC Image Restoration

BCC Match Move

BCC Textures

BCC Textures

BCC Obsolete

BCC Obsolete

BCC Obsolete

BCC Blur & Sharpen

BCC Image Restoration

BCC Blur & Sharpen

BCC Transitions

BCC Blur & Sharpen

BCC Transitions

BCC Blur & Sharpen

BCC Key & Blend

BCC Transitions

BCC Transitions

BCC Blur & Sharpen

BCC Transitions

BCC Transitions

BCC Color & Tone

BCC Film Style

BCC Transitions

BCC Film Style

BCC Film Style

BCC Color & Tone

BCC Color & Tone

BCC Lights

BCC Transitions

BCC Image Restoration

BCC Transitions

BCC Stylize

BCC Transitions

BCC Transitions

BCC Blur & Sharpen

BCC Transitions

BCC Blur & Sharpen

BCC Transitions

BCC Film Style

BCC Stylize

BCC Lens

BCC Lights

BCC Color & Tone

BCC Film Style

BCC Art Looks

BCC Lens

BCC Optical Diffusion

BCC Lights

BCC Lens

BCC Grads and Tints

BCC Art Looks

BCC Key & Blend

BCC Art Looks

BCC Grads and Tints

BCC Grads and Tints

BCC Film Style

BCC Film Style

BCC Image Restoration

BCC Image Restoration

BCC Color & Tone

BCC Lens

BCC Optical Diffusion

BCC Blur & Sharpen

BCC Color & Tone

BCC Optical Diffusion

BCC Optical Diffusion

BCC Grads and Tints

BCC Key & Blend

BCC Color & Tone

BCC Lights

BCC Film Style

BCC Optical Diffusion

BCC Optical Diffusion

BCC Grads and Tints

BCC Lights

BCC Lights

BCC Lights

BCC Color & Tone

BCC Optical Diffusion

BCC Art Looks

BCC Color & Tone

BCC Key & Blend

BCC Lights

BCC Art Looks

BCC Color & Tone

BCC Lights

BCC Lens

BCC Lights

BCC Lights

BCC Film Style

BCC Color & Tone

BCC Key & Blend

BCC Optical Diffusion

BCC Grads and Tints

BCC Optical Diffusion

BCC Art Looks

BCC Key & Blend

BCC Key & Blend

BCC Lights

BCC Grads and Tints

BCC Color & Tone

BCC Optical Diffusion

BCC Lens

BCC Grads and Tints

BCC Lights

BCC Lights

BCC Lights

BCC Color & Tone

BCC Grads and Tints

BCC Color & Tone

BCC Optical Diffusion

BCC Grads and Tints

BCC Optical Diffusion

BCC Grads and Tints

BCC Lights

BCC Grads and Tints

BCC Textures

BCC Film Style

BCC Grads and Tints

BCC Perspective

BCC Transitions

BCC Lens

BCC Art Looks

Title Studio

Title Studio

Title Studio

Title Studio

Title Studio

Title Studio

Title Studio

BCC 3D Objects

Tutorial

Tutorial

Tutorial

Tutorial

Tutorial

Tutorial

Tutorial

Tutorial

Tutorial

Tutorial

Tutorial

Title Studio

Title Studio

Title Studio

Title Studio

Title Studio

Title Studio

Title Studio

Title Studio

Title Studio

Title Studio

Title Studio

Title Studio

Tutorial

Title Studio

Title Studio

Title Studio

Title Studio

Title Studio

Title Studio

Title Studio

Title Studio

Title Studio

Tutorial

Effect:
BCC 2D Particles
BCC 3 Way Color Grade
BCC 3D Extruded Image Shatter
BCC 3D Image Shatter
BCC AE Licensing
BCC Alpha Pixel Noise
BCC Alpha Process
BCC Alpha Spotlight
BCC Apply Modes
BCC Artists Poster
BCC AVX Licensing
BCC Beat Reactor
BCC Beat Reactor Integrated
BCC Beauty Studio
BCC Blobs Wipe
BCC Blur
BCC Blur Dissolve
BCC Boost Blend
BCC Brick
BCC Brightness-Contrast
BCC Broadcast Safe
BCC Bulge
BCC Bump Map
BCC Burnt Film
BCC Cartoon Look
BCC Cartooner
BCC Cast Shadow
BCC Caustics
BCC Charcoal Sketch
BCC Checker Wipe
BCC Chroma Key
BCC Chroma Key Studio
BCC Cloth
BCC Clouds
BCC Color Balance
BCC Color Choker
BCC Color Correction
BCC Color Match
BCC Color Palette
BCC Colorize
BCC Colorize Glow
BCC Colorize Glow Dissolve
BCC Comet
BCC Common Controls
BCC Common Controls - Avid
BCC Compare Mode
BCC Composite
BCC Composite Choker
BCC Composite Dissolve
BCC Corner Pin
BCC Corner Pin Studio
BCC Correct Selected Color
BCC Crash Zoom Dissolve
BCC Criss-Cross Wipe
BCC Cross Glitch
BCC Cross Melt
BCC Cross Zoom
BCC Cube
BCC Curl
BCC Curl Dissolve
BCC Cylinder
BCC Damaged TV
BCC Damaged TV Dissolve
BCC DeGrain
BCC Deinterlace
BCC DeNoise
BCC Directional Blur
BCC Displacement Map
BCC Drop Shadow
BCC Dropout Fixer
BCC Dust and Scratches
BCC Dv Fixer
BCC DVE
BCC DVE Basic
BCC Edge Cleaner
BCC Edge Grunge
BCC Edge Lighting
BCC Effects List
BCC Emboss
BCC Extruded EPS
BCC Extruded Spline
BCC Extruded Text
BCC FAQ
BCC Fast Film Glow
BCC Fast Film Glow Dissolve
BCC Fast Film Process
BCC Fast Flipper
BCC Fast Lens Blur
BCC Film Damage
BCC Film Glow
BCC Film Glow Dissolve
BCC Film Grain
BCC Film Process
BCC Fire
BCC Flicker Fixer
BCC Flutter Cut
BCC Fractal Noise
BCC FX Browser
BCC Gaussian Blur
BCC Glare
BCC Glint
BCC Glitter
BCC Glow Alpha Edges
BCC Glow Matte
BCC Gradient
BCC Granite
BCC Grid Wipe
BCC Grunge
BCC Halftone
BCC Hue-Sat-Lightness
BCC Invert Solarize
BCC Jitter
BCC Jitter Basic
BCC Kaleida Dissolve
BCC Laser Beam
BCC Layer Deformer
BCC LED
BCC Lens Blur
BCC Lens Blur Dissolve
BCC Lens Correction
BCC Lens Distortion Wipe
BCC Lens Flare 3D
BCC Lens Flare Advanced
BCC Lens Flare Dissolve
BCC Lens Flare Round
BCC Lens Flare Spiked
BCC Lens Flash
BCC Lens Shape
BCC Lens Transition
BCC Levels Gamma
BCC Light Leaks
BCC Light Leaks Dissolve
BCC Light Matte
BCC Light Sweep
BCC Light Wipe
BCC Light Wrap
BCC Light Zoom
BCC Lightning
BCC Linear Color Key
BCC Linear Luma Key
BCC Linear Wipe
BCC Looper
BCC Magic Sharp
BCC Make Alpha Key
BCC Match Grain
BCC Match Move
BCC Matte Choker
BCC Matte Cleanup
BCC Median
BCC Misalignment
BCC Mixed Colors
BCC Morph
BCC Mosaic
BCC Motion Blur
BCC Motion Key
BCC Motion Tracker
BCC Motion Tracker AE
BCC Motion Tracker Avid
BCC Motion Tracker FCP
BCC Motion Tracker Motion
BCC Motion Tracker PRM
BCC Motion Tracker Red
BCC Motion Tracker Resolve
BCC Motion Tracker Vegas
BCC Multi Shadow
BCC Multi Stretch Wipe
BCC Multi Stripe Wipe
BCC MultiTone Mix
BCC Noise Map
BCC Noise Map 2
BCC Noise Reduction
BCC Optical Flow
BCC Optical Stabilizer
BCC Organic Strands
BCC Overview in Adobe
BCC Overview in Avid
BCC Overview in FCP
BCC Overview in Resolve
BCC Page Turn
BCC Pan And Zoom
BCC Particle Array 3D
BCC Particle Emitter 3D
BCC Particle Illusion
BCC Particle Illusion Dissolve
BCC Particle System
BCC Pencil Sketch
BCC Pin Art 3D
BCC Pinning Controls
BCC Pixel Chooser
BCC Pixel Fixer
BCC PixelChooser – Legacy
BCC Polar Displacement
BCC Posterize
BCC Posterize Time
BCC Preferences
BCC Premult
BCC Presets
BCC Primatte Studio
BCC Prism
BCC Prism Dissolve
BCC Pyramid Blur
BCC Radial Blur
BCC Radial Wipe
BCC Rain
BCC Rays Cartoon
BCC Rays Dissolve
BCC Rays Puffy
BCC Rays Radiant Edges
BCC Rays Radiant Spotlight
BCC Rays Ring
BCC Rays Ripply
BCC Rays Streaky
BCC Rays Textured
BCC Rays Wedge
BCC Rectangular Wipe
BCC Reflection
BCC Reframer
BCC Remover
BCC Reptilian
BCC Reverse Spotlight
BCC RGB Blend
BCC RGB Blur Dissolve
BCC RGB Displacement Dissolve
BCC RGB Edges
BCC RGB Pixel Noise
BCC Ribbon Wipe
BCC Rings Wipe
BCC Ripple
BCC Ripple Dissolve
BCC Rock
BCC Rough Glow
BCC Safe Colors
BCC Scanline
BCC Scatterize
BCC Sequencer
BCC Smooth Tone
BCC Snow
BCC Sparks
BCC Sphere
BCC Sphere Transition
BCC Spill Remover
BCC Spin Blur Dissolve
BCC Spiral Blur
BCC Spotlight
BCC Spray Paint Noise
BCC Stage Light
BCC Star Matte
BCC Stars
BCC Steel Plate
BCC Super Blend
BCC Swish Pan
BCC Temporal Blur
BCC Textured Wipe
BCC Tile Mosaic
BCC Tile Wipe
BCC Time Displacement
BCC Title Studio
BCC Trails
BCC Trails Basic
BCC Tritone
BCC Tritone Dissolve
BCC Turbulence
BCC Twirl
BCC Twister
BCC Two Strip Color
BCC Two Way Key
BCC Type On Text
BCC Unsharp Mask
BCC UpRez
BCC User Guide
BCC Vector Blur Dissolve
BCC Vector Displacement
BCC Veined Marble
BCC Velocity Remap
BCC Video Glitch
BCC Video Morph
BCC VideoScope
BCC Vignette
BCC Vignette Wipe
BCC VR Blur
BCC VR Flicker Fixer
BCC VR Insert
BCC VR Reorient
BCC VR Sharpen
BCC Warp
BCC Water Color
BCC Water Waves Dissolve
BCC Wave
BCC Weave
BCC Wild Cards
BCC Wire Remover
BCC WitnessProtection
BCC Wood Grain
BCC Wooden Planks
BCC Z Space I
BCC Z Space II
BCC Z Space III
BCC Z-Blur
BCC+ Beauty Studio
BCC+ Blur
BCC+ Camera Shake Dissolve
BCC+ Channel Blur
BCC+ Channel Blur Dissolve
BCC+ Channel Blur YUV
BCC+ Composite
BCC+ Crash Zoom Dissolve
BCC+ Cross Zoom Dissolve
BCC+ Directional Blur
BCC+ Directional Blur Dissolve
BCC+ Dissolve
BCC+ F-Stop
BCC+ Film Glow
BCC+ Film Glow Dissolve
BCC+ Film Grunge
BCC+ Flashing
BCC+ Fluorescent
BCC+ Haze
BCC+ Light Leaks
BCC+ Light Leaks Dissolve
BCC+ Magic Sharp
BCC+ Multi-Star Dissolve
BCC+ Prism
BCC+ Prism Dissolve
BCC+ Rack Focus Dissolve
BCC+ Radial Blur
BCC+ Rays Dissolve
BCC+ Smear Blur
BCC+ Spin Blur Dissolve
BCC+ Two Strip
BCC+ Video Glitch
BCC+ Vignette
BCC+Ambient Light
BCC+Black and White
BCC+Bleach Bypass
BCC+Borders
BCC+Camera Shake
BCC+Center Spot
BCC+Chroma Bands
BCC+Chromatic Aberration
BCC+Color Gradient
BCC+Color Infrared
BCC+Color Paste
BCC+Color Shadow
BCC+Color Spot
BCC+Colorize Gradient
BCC+Cross Processing
BCC+Day for Night
BCC+DeBand
BCC+DeBlock
BCC+Defog
BCC+DeFringe
BCC+Depth of Field
BCC+Detail
BCC+Develop
BCC+Diffusion
BCC+Double Fog
BCC+Dual Gradient
BCC+Edge Composite
BCC+Enhancing
BCC+Eye Light
BCC+Film Stocks
BCC+Fog
BCC+Frost
BCC+FX-Editor
BCC+Gels
BCC+Glow
BCC+Glow Darks
BCC+Glow Edges
BCC+Grade
BCC+Halo
BCC+Harris Shutter
BCC+High Contrast
BCC+Holdout Composite
BCC+Ice Halos
BCC+Infrared
BCC+Kelvin
BCC+Key Light
BCC+Lens Distortion
BCC+Lens Flare
BCC+Light
BCC+Looks
BCC+Low Contrast
BCC+Math Composite
BCC+Mist
BCC+ND Gradient
BCC+Net
BCC+Night Vision
BCC+Non-Additive Mix
BCC+Optical Dissolve
BCC+Overexpose
BCC+Photographic
BCC+Polarizer
BCC+Rack Focus
BCC+Radial Exposure
BCC+Radial Tint
BCC+Rays
BCC+Reflector
BCC+ReLight
BCC+Selective Saturation
BCC+Sepia
BCC+Shadows/Highlights
BCC+Silk
BCC+Skin Tone
BCC+Split Field
BCC+Split Tone
BCC+Streaks
BCC+Sunset
BCC+Textures
BCC+Three Strip
BCC+Tint
BCC+Transform
BCC+Video Glitch Dissolve
BCC+Wide Angle Lens
BCC+X-Ray
Removed Gradient Parameters
Title Studio - The Title Container Parameter Guide
Title Studio Basics
Title Studio- Animating an Object Using Keyframes
Title Studio- Creating a Credit Roll
Title Studio- Creating a Credit Roll Part Two
Title Studio- Creating A Fade Effect
Title Studio- Creating a Type on Effect with Title Containers
Title Studio- Creating an Animated Lower Third
Title Studio- Image Processors
Title Studio- Image Processors - Blur Shaders
Title Studio- Image Processors - Glow Shaders
Title Studio- Image Processors - Gradient Shaders
Title Studio- Image Processors - Key Shaders
Title Studio- Image Processors - Light Rays
Title Studio- Image Processors - Light Sweep
Title Studio- Image Processors - Scan Lines
Title Studio- Image Processors - Spotlight
Title Studio- Image Processors - Wipe Shaders
Title Studio- Image Processors- Linear Ripple
Title Studio- Keyframe Palette
Title Studio- Scene Container Parameter Guide
Title Studio- The Animation Tab
Title Studio- The Camera Tab
Title Studio- The Composite Tab
Title Studio- The Container Position Tab
Title Studio- The History Palette
Title Studio- The Info Window
Title Studio- The Lights Tab
Title Studio- The Preferences Panel
Title Studio- The Project Settings Window
Title Studio- The Render Tab
Title Studio- The Text Tool
Title Studio- The Tools Window
Title Studio- The User Marks Window
Title Studio- Understanding Track Structure
Title Studio- Working With Deformers
Title Studio- Working With Image Processor Shaders
Title Studio- Working With Spline Media
Title Studio- Working with the Composite Window
Title Studio- Working with the Controls Window
Title Studio- Working with the Timeline Window
Working in Vegas Pro

PRODUCT UPDATES & SPECIAL OFFERS

Join our email newsletter and keep up to date