Overview
The BCC Pan and Zoom filter was designed to automate the work of documentary style pan and zoom effects, where a large still image file is moved along the x and y axis (pan) and scaled up or down (zoom) in a composite, in effect, adding animation to a still image. The BCC Pan and Zoom filter includes on-screen HUD widgets (heads-up display) to achieve this end result with precision and ease and also includes state-of-the-art algorithms that generate a razor sharp image result even when the image has been subject to a large transform scale. The filter can be run in full automatic, semi automatic or full manual animation modes, but any way you choose it’s easy to use and generates smooth animation and a sharp image result.
Preview Mode
The unique Preview Mode is the key to BCC Pan and Zoom’s simplicity. It makes setting up a move much simpler than dialing in parameters directly, and the Pan and Zoom parameter interpretation is based on the fact that moves are configured through the Preview Mode. If you try to tweak individual transform parameters without first enabling the Preview Mode you may find the controls work in unexpected ways which is not an error but a reflection of the fact that the transform parameters are designed to be edited primarily from within the Preview Mode.
Animation Workflows
Three different animation workflow options are included in the pan and zoom filter – fully automatic, semi automatic or manual.
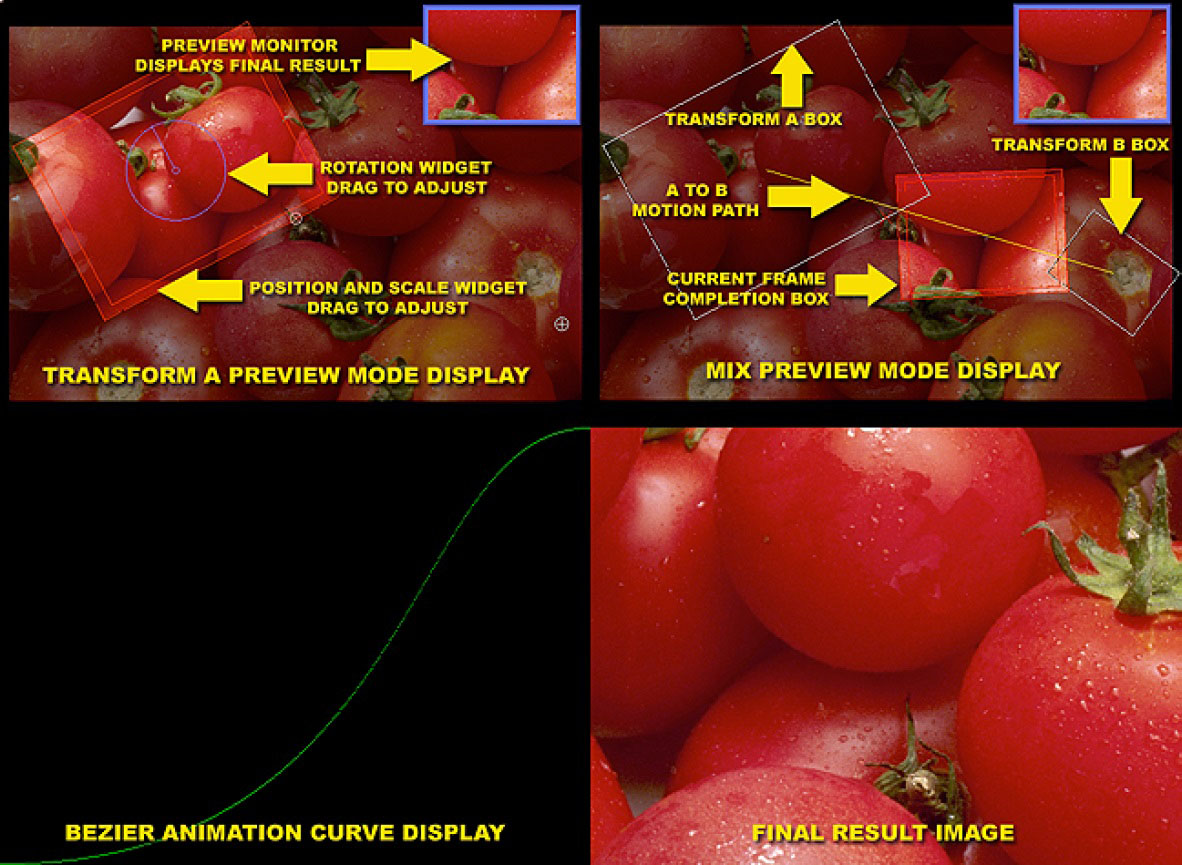
In fully automatic mode, the user sets the position, rotation and scale for the starting point (Transform A region box) and the ending point (Transform B region box) of the image, using the filters’ on-screen widgets. The filter then automatically animates from the A to B region along the duration of the clip in the timeline.
There are controls with an on-screen display curve for adjusting the velocity of the ease in and the ease out for the start and end of the animation, and for the amount of frames for which you want the image to hold at the start and end of the effect. The advantage of using the full-automatic mode is that no keyframes are required and the smoothness of the animation velocity at the start and end of the effect can be controlled from within the filter. Since no keyframes need to be set in this workflow, it is easy to save presets that encapsulate a complete pan and zoom move.
In semi-automatic mode the user sets the position, rotation and scale for the starting point (Transform A region box) and the ending point (Transform B region box) of the image, using the filters’ on-screen widgets, and then only needs to set keyframes for the completion parameter, which instructs the filter where the animation should be at a given point in time. The advantage to the semi-automatic mode is that the user can directly control exactly the speed and position of the image animation using the completion parameter, however the smoothness at the start and end of the effect must be controlled via host bezier transform handles. In short, semi-automatic mode works just like fully automatic mode except that the animation is based on setting keyframes for the completion slider rather than auto-animation based on clip duration.
In manual mode, the user sets the position, rotation and scale for the Transform A region box at the start of the timeline and manually creates separate keyframes for position, rotation and scale. Then the user sets the current time indicator to the end of the timeline, sets new keyframes for the filter’s position, rotation and scale parameters and repositions the Transform A region box. Animation is then generated between the individual Transform A keyframes. The advantage of using full manual mode is that the user retains complete control over every aspect of the animation.
Users should take note that the pan and zoom, when in automatic mode, depends upon the length of the clip to which is is applied. If you are using this filter in After Effects and the clip is longer than the comp, then you should pre-comp the clip in order to generate the expected result.
Resolution
Note that Pan and Zoom supports loading external still image files with dimensions up to 16,000 X 16,000, assuming there is sufficient available memory. The amount of memory actually available to the Pan and Zoom effect can vary considerably based on which host you are running and upon the details of the project.
Fully-Automatic Mode Workflow:
AVX:
- Add project sized clip or solid to timeline
- Set current time indicator to the start of the clip
- Apply pan and zoom filter to the clip
- Twirl down source group
- Set source pop-up to external file
- Click on the external file button to load still image file
- Twirl up source group
- Set workflow to AB Auto-Animation mode
- Enable preview mode
- Set preview target pop-up to setup A
- Twirl down the transforms group
- Drag the red rectangle to the starting position in the frame
- Drag on one of the sides or corners of the red rectangle to set the starting scale
- Drag on the rotation dial to set the starting rotation
- Set preview target pop-up to setup B
- Drag the red rectangle to the ending position in the frame
- Drag on one of the sides or corners of the red rectangle to set the ending scale
- Drag on the rotation dial to set the ending rotation
- Set the preview target pop-up to mix
- Preview the result
- Twirl down the animation group
- Click on the preview ease curve check-box to enable the curve view
- Adjust the animation velocity at the start and end of the curve via the ease-in and ease-out parameters
- Click on the preview ease curve check-box to disable the curve view
- Disable preview mode
- Render to disc
AE/Premiere:
- Add project sized clip or solid to comp timeline
- Set current time indicator to the start of the layer
- Apply pan and zoom filter to the clip
- Twirl down source group
- Set source pop-up to external file
- Beside external file parameter, click on the L button to load still image file
- Twirl up source group
- Set workflow to AB Auto-Animation mode
- Enable preview mode
- Set preview target pop-up to setup A
- Twirl down the transforms group
- Drag the red rectangle to the starting position in the frame
- Drag on one of the sides or corners of the red rectangle to set the starting scale
- Drag on the rotation dial to set the starting rotation
- Set preview target pop-up to setup B
- Drag the red rectangle to the ending position in the frame
- Drag on one of the sides or corners of the red rectangle to set the ending scale
- Drag on the rotation dial to set the ending rotation
- Set the preview target pop-up to mix
- Preview to RAM to preview the result
- Twirl down the animation group
- Click on the preview ease curve check-box to enable the curve view
- Adjust the animation velocity at the start and end of the curve via the ease-in and ease-out parameters
- Click on the preview ease curve check-box to disable the curve view
- Disable preview mode
- Render to disc
FX Plug:
- Add project sized clip or solid to comp timeline
- Set current time indicator to the start of the clip
- Apply pan and zoom filter to the clip
- Unhide source group
- Set source pop-up to external file
- Beside external file parameter, click on the L button to load still image file
- Hide source group
- Set workflow to AB Auto-Animation mode
- Unhide the transforms group
- Set preview mode to floating viewport
- Set preview target pop-up to setup A
- Drag the scale A parameter in the controls window to set the starting scale
- Drag the position A parameter in the controls window to the starting position in the frame
- Drag the the rotation A parameter in the controls window to set the starting rotation
- Set preview target pop-up to setup B
- Drag the scale B parameter in the controls window to set the ending scale
- Drag the position B parameter in the controls window to the ending position in the frame
- Drag the rotation B parameter in the controls window to set the ending rotation
- Set the preview target pop-up to mix
- Preview the result
- Unhide the animation group
- Click on the preview ease curve check-box to enable the curve view
- Adjust the animation velocity at the start and end of the curve via the ease-in and ease-out parameters
- Click on the preview ease curve check-box to disable the curve view
- Set preview mode pop-up to none
- Render to disc
Sony Vegas:
- Add project sized clip or solid to comp timeline
- Set current time indicator to the start of the clip
- Apply pan and zoom filter to the clip
- Open the source group
- Set source pop-up to external file
- Click the external file button
- Close the source group
- Set workflow to AB Auto-Animation mode
- Open the transforms group
- Set preview mode to floating viewport
- Set preview target pop-up to setup A
- Drag the scale A parameter in the controls window to set the starting scale
- Drag the position A parameter in the controls window to the starting position in the frame
- Drag the the rotation A parameter in the controls window to set the starting rotation
- Set preview target pop-up to setup B
- Drag the scale B parameter in the controls window to set the ending scale
- Drag the position B parameter in the controls window to the ending position in the frame
- Drag the rotation B parameter in the controls window to set the ending rotation
- Set the preview target pop-up to mix
- Preview the result
- Close the animation group
- Click on the preview ease curve check-box to enable the curve view
- Adjust the animation velocity at the start and end of the curve via the ease-in and ease-out parameters
- Click on the preview ease curve check-box to disable the curve view
- Set preview mode pop-up to none
- Render to disc
Semi-Automatic Mode Workflow:
AVX:
- Add project sized clip or solid to comp timeline
- Set current time indicator to the start of the clip
- Apply pan and zoom filter to the clip
- Twirl down source group
- Set source pop-up to external file
- Click on the external file button to load still image file
- Twirl up source group
- Set workflow to AB Completion mode
- Enable preview mode
- Set preview target pop-up to setup A
- Twirl down the transforms group
- Drag the red rectangle to the starting position in the frame
- Drag on one of the sides or corners of the red rectangle to set the starting scale
- Drag on the rotation dial to set the starting rotation
- Set preview target pop-up to setup B
- Drag the red rectangle to the ending position in the frame
- Drag on one of the sides or corners of the red rectangle to set the ending scale
- Drag on the rotation dial to set the ending rotation
- Set the preview target pop-up to mix
- Twirl down the animation group
- At the start of the clip, set a keyframe for the completion parameter
- Set the completion amount to 0
- Move the current time indicator to the end of the clip
- Set a keyframe for the completion parameter
- Set the completion amount to 100
- Disable preview mode
- Render to disc
AE/Premiere:
- Add project sized clip or solid to comp timeline
- Set current time indicator to the start of the layer
- Apply pan and zoom filter to the clip
- Twirl down source group
- Set source pop-up to external file
- Beside external file parameter, click on the L button to load still image file
- Twirl up source group
- Set workflow to AB Completion mode
- Enable preview mode
- Set preview target pop-up to setup A
- Twirl down the transforms group
- Drag the red rectangle to the starting position in the frame
- Drag on one of the sides or corners of the red rectangle to set the starting scale
- Drag on the rotation dial to set the starting rotation
- Set preview target pop-up to setup B
- Drag the red rectangle to the ending position in the frame
- Drag on one of the sides or corners of the red rectangle to set the ending scale
- Drag on the rotation dial to set the ending rotation
- Set the preview target pop-up to mix
- Twirl down the animation group
- At the start of the clip, set a keyframe for the completion parameter
- Set the completion amount to 0
- Move the current time indicator to the end of the clip
- Set a keyframe for the completion parameter
- Set the completion amount to 100
- Disable preview mode
- Render to disc
FX Plug:
- Add project sized clip or solid to comp timeline
- Set current time indicator to the start of the clip
- Apply pan and zoom filter to the clip
- Unhide source group
- Set source pop-up to external file
- Beside external file parameter, click on the L button to load still image file
- Hide source group
- Set workflow to AB Completion mode
- Unhide the transforms group
- Set preview mode to floating viewport
- Set preview target pop-up to setup A
- Drag the scale A parameter in the controls window to set the starting scale
- Drag the position A parameter in the controls window to the starting position in the frame
- Drag the the rotation A parameter in the controls window to set the starting rotation
- Set preview target pop-up to setup B
- Drag the scale B parameter in the controls window to set the ending scale
- Drag the position B parameter in the controls window to the ending position in the frame
- Drag the rotation B parameter in the controls window to set the ending rotation
- Set the preview target pop-up to mix
- Unhide the animation group
- At the start of the clip, set a keyframe for the completion parameter
- Set the completion amount to 0
- Move the current time indicator to the end of the clip
- Set a keyframe for the completion parameter
- Set the completion amount to 100
- Set preview mode pop-up to none
- Render to disc
Sony Vegas:
- Add project sized clip or solid to comp timeline
- Set current time indicator to the start of the clip
- Apply pan and zoom filter to the clip
- Open the source group
- Set source pop-up to external file
- Click the external file button
- Close the source group
- Set workflow to AB Auto-Animation mode
- Open the transforms group
- Set preview mode to floating viewport
- Set preview target pop-up to setup A
- Drag the scale A parameter in the controls window to set the starting scale
- Drag the position A parameter in the controls window to the starting position in the frame
- Drag the the rotation A parameter in the controls window to set the starting rotation
- Set preview target pop-up to setup B
- Drag the scale B parameter in the controls window to set the ending scale
- Drag the position B parameter in the controls window to the ending position in the frame
- Drag the rotation B parameter in the controls window to set the ending rotation
- Set the preview target pop-up to mix
- Preview the result
- Close the animation group
- Click on the preview ease curve check-box to enable the curve view
- Adjust the animation velocity at the start and end of the curve via the ease-in and ease-out parameters
- Click on the preview ease curve check-box to disable the curve view
- Set preview mode pop-up to none
- Render to disc
Manual Workflow:
AVX:
- Add project sized clip or solid to comp timeline
- Set current time indicator to the start of the clip
- Apply pan and zoom filter to the clip
- Twirl down source group
- Set source pop-up to external file
- Click on the external file button to load still image file
- Twirl up source group
- Set workflow to transform A mode
- Enable preview mode
- Twirl down transform A group
- Drag the red rectangle to the start position in the frame
- Drag on one of the sides or corners of the red rectangle to set the start scale
- Drag on the rotation dial to set the starting rotation
- Add a keyframe
- Move current time indicator to the end of the clip
- Add a keyframe
- Drag the red rectangle to the ending position in the frame
- Drag on one of the sides or corners of the red rectangle to set the ending scale
- Drag on the rotation dial to set the ending rotation
- Preview the result
- Disable preview mode
- Render to disc
AE/Premiere:
- Add project sized clip or solid to comp timeline as a new layer
- Set current time indicator to the start of the layer
- Apply pan and zoom filter to the clip
- Twirl down source group
- Set source pop-up to external file
- Beside external file parameter, click on the L button to load still image file
- Twirl up source group
- Set workflow to transform A mode
- Rnable preview mode
- Twirl down transform A group
- Drag the red rectangle to the starting position in the frame
- Drag on one of the sides or corners of the red rectangle to set the starting scale
- Drag on the rotation dial to set the starting rotation
- Set keyframes for position A, scale A and rotation A
- Move current time indicator to the end of the layer
- Drag the red rectangle to the ending position in the frame
- Drag on one of the sides or corners of the red rectangle to set the ending scale
- Drag on the rotation dial to set the ending rotation
- Preview to RAM to preview the result
- Disable preview mode
- Render to disc
FX Plug:
- Add project sized clip or slug to comp timeline
- Set current time indicator to the start of the clip
- Apply pan and zoom filter to the clip
- Unhide source group
- Set source pop-up to external file
- Beside external file parameter, click on the L button to load still image file
- Hide source group
- Set workflow to transform A mode
- Unhide transform a group
- Set preview mode to floating viewport
- Enter numeric values for scale to set the start scale
- Enter numeric values in transform x and y parameter to set the start position in the frame
- Enter numeric values for rotation to set the start angle
- Set keyframes for anchor, scale and rotation
- Move current time indicator to the end of the clip
- Set keyframes for anchor, scale and rotation
- Enter numeric values for scale to set the ending scale
- Enter numeric values in transform x and y parameter to set the ending position
- Enter numeric values for rotation to set the ending angle
- Preview the result
- Set preview mode pop-up to none
- Render to disc
Sony Vegas:
- Add project sized clip or solid to comp timeline
- Set current time indicator to the start of the clip
- Apply pan and zoom filter to the clip
- Open the source group
- Set source pop-up to external file
- Click the external file button
- Close the source group
- Set workflow to AB Auto-Animation mode
- Open the transforms group
- Set preview mode to floating viewport
- Set preview target pop-up to setup A
- Drag the scale A parameter in the controls window to set the starting scale
- Drag the position A parameter in the controls window to the starting position in the frame
- Drag the the rotation A parameter in the controls window to set the starting rotation
- Set preview target pop-up to setup B
- Drag the scale B parameter in the controls window to set the ending scale
- Drag the position B parameter in the controls window to the ending position in the frame
- Drag the rotation B parameter in the controls window to set the ending rotation
- Set the preview target pop-up to mix
- Preview the result
- Close the animation group
- Click on the preview ease curve check-box to enable the curve view
- Adjust the animation velocity at the start and end of the curve via the ease-in and ease-out parameters
- Click on the preview ease curve check-box to disable the curve view
- Set preview mode pop-up to none
- Render to disc
Parameter Control Listing:
Presets and Common Controls
BCC filters come with a library of factory installed presets plus the ability to create your own custom presets and preview them with the BCC FX Browser™.
BCC filters also include common controls that configure global effect preferences and other host-specific effect settings.
For more information about working with presets and other common controls, Click Here.
Source Group
Source pop-up: Sets the input image source for the pan and zoom effect
- host layer – uses a layer already imported into the host
- external file – uses an image which has not been imported into the host external file – load mechanism to import an external image file
External File: If the Source menu is set to use an external file, this button launches a file browser dialog for selecting which external media file to use as the source.
Watch Folder – The filter looks through your computer for the external image source if it cannot be found at the previously known location. This is useful for finding missing media when the project is opened on a different system to which it was created or when media storage locations have changed. This is a global preference so when the watch folder is set in one instance of pan and zoom it will be used automatically by all other instances of Pan and Zoom.
Host Layer: This menu selects which host layer will be used as the source image.
Source Pixel Aspect Ratio pop-up: Sets the aspect ratio of the source image (which may be different than the aspect ratio of the current project).
Aspect: Lets you manually tweak the source pixel aspect ratio to stretch the image horizontally or vertically.
Video Safe Colors:Controls whether the source clip levels are remapped to video safe ranges (16-235 in 8bit).
Workflow Pop-up:
- Transform A – Sets the filter to run in manual, transform A only mode.
- Transform B – Sets the filter to run in manual, transform B only mode.
- AB Completion – Sets the filter to run in semi-automatic completion animation mode.
- AB Auto–Animation – Sets the filter to run in fully automatic mode.
- BA Auto-Animation – Sets the filter to run in reverse, fully automatic mode.
Animation Group
Scale Interpolation Pop-up
- straight – straight linear zoom from setting A to setting B.
- exponential – more natural exponential zoom which matches the behavior or a real camera zoom from setting A to setting B.
Completion: Keyframe this parameter when in AB completion mode to generate animation.
Hold Start: Sets the amount of frames for which there is no animation at the start of the effect. Hold frames are set as a percentage of the clip duration.
Hold End: Sets the amount of frames for which there is no animation at the end of the effect. Hold frames are set as a percentage of the clip duration.
Ease In: Sets the amount of softness at the start of the animation curve.
Ease Out: Sets the amount of softness at the end of the animation curve.
Preview Ease Curve: Displays the on-screen graph of the animation curve.
Preview Group
The Preview Mode is the key to BCC Pan and Zoom’s simplicity. It eliminates the need to configuring parameters when setting up a move. The Pan and Zoom parameter version sets up the moves through the Preview Mode. If you try to tweak individual transform parameters by enabling the Preview Mode you may find the controls work in unexpected ways which is not an error. This transform parameters are designed to be edited within the Preview Mode.
Preview Mode: Enables or disables the preview mode which sets up the move with on-screen widgets for guidance. Enable Preview Mode when configuring the move and be sure to disable the Preview Mode once setup is complete in order to generate the final render result.
Preview Target Pop-up: Switches the on-screen User Interface during set-up mode.
- setup A – displays setup A on-screen user interface widgets.
- setup B – displays setup B on-screen user interface widgets.
- mix – displays the setup A and B user interface widgets as well as a box showing the animation.
Preview Monitor Pop-up: Displays the final result in a small on-screen window.
- none – no display.
- top left – display shown in top left of frame.
- top right – display shown in top right of frame.
- bottom left – display shown in bottom left of frame.
- bottom right – display shown in bottom right of frame.
Luma Shift: Reduces or increases the luminosity of the area outside of the setup window action.
Action Safe: Displays the action safe zone within the setup box.
**Title Safe:**Displays the title safe zone within the setup box.
4:3 Safe: Displays the 4:3 safe zone withing the setup box.
Rotation Control: Enables or disables the rotation control on-screen the user interface widget.
Enable 3D: Enables 3D viewing.
Transforms Group
Adjust Scale Pop-up: Sets the scale of the image in the preview window off fit to either 100 percent or 100 percent letterbox.
Lock Anchor checkbox: Locks the anchor position to the center of the input image when enabled.
Rotation Center Pop-up: Sets the center for image rotation.
- final viewport – rotates the image around the center of the currently visible frame
- anchor – rotates the image around the center of the current anchor position
Position A (x / y ): Sets the position of the animation at the start of the effect.
Anchor A (x / y): Sets the anchor for the animation at the start of the effect.
Scale A: Sets the scale of the image at the start of the effect.
Rotation A: Sets the rotation angle of the image at the start of the effect.
Spin A: Spins the starting point of the image.
Tumble A: Tumbles (flips over) the starting point of the image.
Position B (x / y): Sets the position of the animation at the end of the effect.
Anchor B (x / y): Sets the anchor for the animation at the end of the effect.
Scale B: Sets the scale of the image at the end of the effect.
Rotation B: Sets the rotation angle of the image at the end of the effect.
Spin B: Spins the ending point of the image.
Tumble B: Tumbles (flips over) the ending point of the image.
Cropping Group
The cropping group tweaks the amount of frame that will be removed from the clip.
- Top: Adjusts the amount of pixels cropped from the top.
- *Left:*Adjusts the amount of pixels cropped from the left.
- Bottom: Adjusts the amount of pixels cropped from the bottom.
- Right: Adjusts the amount of pixels cropped from the right.
Motion Blur Group
Smoothness Pop-up: Adjusts the smoothness of the motion. There are four options:
- Rough
- Medium
- Smooth
- Smoothest
Shutter Angle: Controls the angle from which the shutter is pointing at the animation.
Adaptive Motion Blur Mode: Clicking the checkbox makes it the filter handle automate motion blur.
Quality Group
Method pop-up:
- Fast
- Sharp
- Standard
- Smooth
- Magic**sharp
- Magic smooth
Sharpness Amount: Controls the sharpness for scale settings where the image is zoomed in beyond it’s native resolution.
Softness Amount: Controls the softness for scale settings where the image is being down sized from higher resolution.
**Reduce flicker popup:**Adjusts the amount of flicker that appears in the video clip.
Mix (Fxplug only): Blends the effect with the original image clip to which the filter was applied.
Vignette Group
Center: Controls the center point of the vignette.
Style: Controls whether the filter produces a color vignette, a blur vignette, or both.
Radius: Controls the overall size of the vignette shape.
Vignette Color: Controls the color of the vignette region.
Vignette Color Opacity: Controls the opacity of the colored vignette region. Higher opacity produces solid vignette colors as you progress to the outer regions of the vignette, whereas lower opacity creates more subtle, partial color shifts.
Blur Offset: Controls the relative radius of the blur vignette versus the radius of the color vignette (when the Style is set to Color and Blur). At the default value of zero the color and blur vignette regions have the same size (as determined by the shared Radius control). Larger values cause the blur vignette radius to be proportionally larger than the color vignette radius, whereas negative values cause the blur vignette radius to be proportionally smaller than the color vignette radius.
Blur Amount: Defines the peak blurriness amount as you reach the outer regions of the vignette.
Squareness: Controls whether the vignette shape is elliptical, rectangular, or somewhere in between.
Softness: Softens the edges of the vignette shape.
**Smooth Softness:**For a given Softness, this controls the smoothness of the transition between the inside and outside regions. With higher values tend to produce smoother, more natural looking gradations.
Stretch: Controls the relative width vs height of the vignette shape.
Rotate: Rotates the shape.
Source Intensity: Rotates the shape.
Combine: Popup menu which determines the blend mode used to apply the color vignette back onto the original source layer. (Not relevant for the blur vignette.)
- Composite
- Mult
- Add
- Screen
- Subtract Inv.