Overview
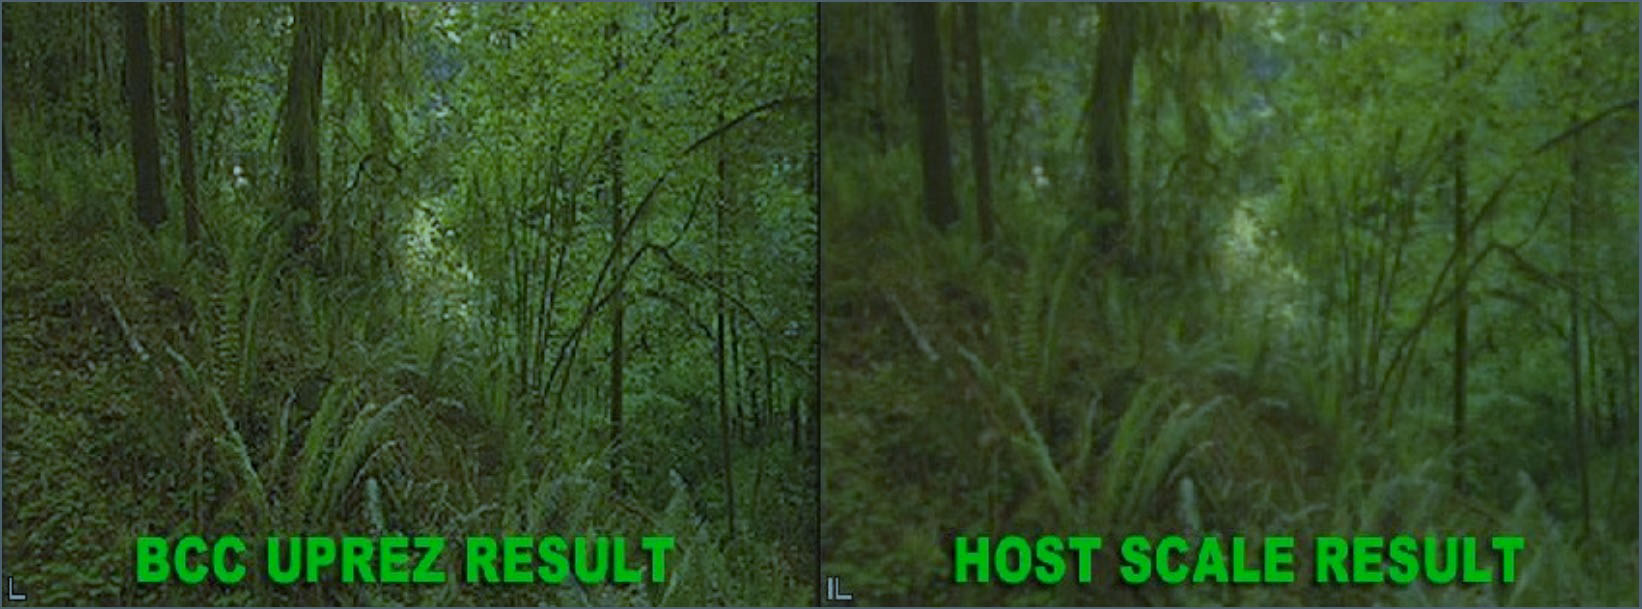
BCC Uprez is used to increase the resolution of source clips (for example SD to HD or SD/HD to UHD) while ensuring maximum possible image quality. Uprez uses advanced techniques to maintain and fine tune image details, generating much higher quality final images than can be obtained with standard host upscaling.
BCC UpRez vs BCC Reframer: Note that BCC Reframer and BCC UpRez have partially overlapping features in that both can be used to convert SD to HD / UHD formats or HD to UHD (as examples). BCC Reframer is the best choice when embedding vertical cell phone footage into horizontal frames since it has more extensive control over the framing and over the various methods for filling/padding the edge regions. BCC Reframer also tends to be easier to configure and is great for quickly converting large numbers of SD clips into HD/UHD formats or HD to UHD. BCC Uprez is appropriate when the primary concern is achieving the highest possible upscaling quality, as opposed to ease of use or edge style options, since the UpRez workflow guarantees that all processing happens in a single pass, even when the pixel aspect ratios of the source and destination do not match. BCC Reframer offers the same advanced resampling algorithms as UpRez, but compensation for differing pixel aspect ratios will be done by the host in a separate pass.
Due to the special nature of BCC UpRez the parameter list and suggested workflow can vary considerably from one host to another. Please consult the Workflow section for your particular host at the bottom of this document.
BCC UpRez Filter Parameter List
Presets and Common Controls
BCC filters come with a library of factory installed presets plus the ability to create your own custom presets and preview them with the BCC FX Browser™.
BCC filters also include common controls that configure global effect preferences and other host-specific effect settings.
For more information about working with presets and other common controls, Click Here.
Workflow pop-up:(FxPlug only) Determines whether the filter will use media pulled directly from a well layer or media which has been nested inside a larger sized clip. See the worfklow section for FCP X and Motion towards the end of this document.
- Well Layer – this option requires the user to drag media from the project bin directly into the filter’s Source Layer Image Well
- Nested Sequence -this option requires the user to nest the smaller clip (at original resolution) inside a full sized clip, to which the filter is then applied.
Source Group
Contains parameters that affect the filtered source image
- Source Layer (Adobe) – Displays a list of all layers in the current comp. Select the layer to UpRez from this list.
- Source Pixel Aspect Ratio pop-up – Used to set the Pixel Aspect Ratio (PAR) of the source clip
- Source Size pop-up (FCP / Avid MC / RED) – Used to set the source size
- Source Width (FCP / Avid MC / RED) – Additional control used to set the source width
- Source Height (FCP / Avid MC / RED) – Additional control used to set the source depth
Transform Group
Contains parameters for controlling the scale transformation of the clip
Frame Size pop-up*(Adobe)* – Contains a list of image size standard formats to be used to set the final image size
Result Width*(Adobe*) – Used to set width of the final size – available when Custom Size is selected in Frame Size pop-up
Result Height (Adobe) – Used to set height of the final size – available when Custom Size is selected in Frame Size pop-up
Lock Height to X – Links X and Y values – available when Custom Scale is selected inFrame Size pop-up
Scale X: Used to set width of the final size – available when Custom Scale is selected in Frame Size pop-up
Scale Y: Used to set height of the final size – available when Custom Scale is selected in Frame Size pop-up
Center: Used to set the center position of the result
Framing pop-up: Includes 3 options that determine how the result is framed
- Fit in Frame (Letterbox) – Scales the image to fill the final size without any distortion or cropping
- Fill Frame (Crop) – Scales the image to fill the final size, cropping the image to avoid distortion
- Distort to Fit (Stretch) – Scales the image to fill the final size, distorting the image if necessary
Quality Group
Contains the parameters for controlling the final image quality
Method pop-up: Includes the following 7 options that determine the image sharpness / smoothness
- Draft
- Fast
- Sharp
- Standard
- Smooth
- Magic Smooth
- Magic Sharp
Sharpness: The value here determines the amount of sharpness / smoothness that is applied to the image
Quick Start Workflows:
For best results be sure to review the suggested workflow for your particular host since the details can vary considerably from one host to another.
Avid Workflow
In Avid hosts there are two variations on the filter – “”Uprez” and “Uprez Deint”. The standard “Uprez” version appears as an RT (green-dot) filter whereas the “Uprez Deint” version is not an RT filter in Avid. In general using the standard RT version offers easier previews in the avid timeline without the need for rendering, but the “Uprez Deint” filter offers the ability to use advanced deinterlacing controls for maximum quality when you happen to be working in an interlaced final project. Due to limitations in the Avid rendering pipeline these advanced deinterlacing controls are only available in non-RT filters. If you are working in a progressive final project then the advanced deinterlacing controls are not relevant and you can just use the standard RT version. However to achieve maximum possible final image quality when working in an interlaced final project you should choose the Uprez Deint version.
Avid Frame rate conversion handling: Due to host-side limitations in the Avid rendering pipeline there are special workarounds that must be used with Uprez when the frame rate of the original SD clip does not match the frame rate of of the final HD project. BCC Uprez in Avid relies on the “Do Not Resize Smaller Images” option in the media import settings in order force the host to keep the media at the original lower resolution so that the upscaling can be done by Uprez. However when “Do Not Resize Smaller Images” is enabled the Avid host does not properly convert the media frame rates (if they are different) which then leads to dropped frames in the final result. If your SD and HD formats have the same frame rate this is not an issue and you can use Uprez in a single pass. However if your SD and HD formats have different frame rates you must first convert the SD clip to the new frame rate (while maintaining the original SD resolution) in an initial pass. You can then use Uprez to do the upscaling in a second pass once the frame rates match.
In Avid hosts we apply BCC UpRez filter to an SD source clip that has been embedded in an HD timeline. Here’s how:
-
Create an HD timeline in Avid MC
-
Import the media that is to be uprezzed into the HD timeline bin
-
Note: It’s important to import the media at it’s native size so you should click on the options button in the media import dialog box and select the “Do Not Resize Smaller Images” option
-
The imported SD clip is now centered in an HD frame with black regions surrounding the content on all sides.
-
Cut the imported clip into the timeline
-
Drag the BCC Uprez filter onto the SD clip in the HD timeline
-
Go into effects mode to access the filter parameters
-
In the Source menu set the pixel aspect ratio and source size parameters to match the original SD content specs.
-
Twirl down the Transform group and select “Fill Frame (Crop)” from the Framing options pop-up or other framing options as desired.
-
Twirl down the Quality group and select Magic Sharp from the Method pop-up
-
When using the “Uprez Deint” version (see paragraph above), go into the General Controls group and experiment with the Fields menu to see if can produce higher quality final results. Try setting Fields to Motion Detect (if the SD clip was interlaced) or to Progressive (if the SD clip was progressive).
-
Set the sharpness level to 25 and observe the result, then increase or decrease the sharpness parameter value as necessary
Adobe After Effects Workflow
In After Effects, we apply the filter to a solid that is the final destination size and select the clip to be uprezzed from the Comp timeline. Here’s how:
- Create an HD composite
- Import the SD clip to be uprezzed into the AE project window
- Override the SD clip’s Pixel Aspect Ratio to match the Pixel Aspect ratio of the final HD Seq (in AE Proj. window right click on the SD clip & select Interpret Footage > Main)
- Drag the SD clip into the HD timeline and click on the eyeball to hide the video
- Create a new HD sized solid layer in the HD comp
- Apply the BCC UpRez filter to the solid layer
- Go to the filter’s effect controls and twirl down the source layer group
- Select the SD clip from the Source Layer pop-up
- Set the Source Pixel Aspect ratio pop-up to match the true pixel aspect ratio of the original SD clip
- Twirl down the Transform group and select select “Fill Frame (Crop)” from the Framing options pop-up or other framing options as desired.
- Twirl down the Quality group and select Magic Sharp from the Method pop-up
- Set the sharpness level to 25 and observe the result, then increase or decrease the sharpness parameter value as necessary
Adobe Premiere Pro Workflow
- Import an SD clip into HD sequence
- Reinterpret clip to match the pixel aspect ratio of the final HD sequence (in Premiere project window)
- Generate a black video slug
- Place the black video slug in the Premiere Pro timeline on video track 3
- Place the imported media in video track 2
- Apply the BCC UpRez filter to the black video
- Set the source layer pop-up in the filter to use video track 2
- Set the source pixel aspect ratio pop-up to match the true source pixel aspect ratio of the original SD clip.
- Set the frame size pop-up to layer size
- Set the framing pop-up to desired option (fill frame/letterbox/stretch)
- Set quality settings to desired option for image enhancement (sharp/smooth etc). It is worth experimenting with different quality settings to optimize the results for your individual clip. A recommended starting point is to use the Magic Sharp quality setting from the Method pop-up and to set the sharpness level to 25.
Sony Vegas Workflow
Let’s take the example of a client that needs to use an SD clip in an HD project.
-
Import your SD clip into your HD project
-
In the Properties for this clip in the Project Media tab, in addition to setting any standard properties like making sure the fielding is correct you must do this special step: ALWAYS make sure the Pixel Aspect Ratio for the SD clip is set to match the pixel aspect ratio of the final HD project, regardless of what the actual pixel aspect ratio is for that clip. You will compensate for the clip pixel aspect ratio separately from within the UpRez plugin itself. This avoids an unnecessary double stretch of the image which will ensure maximum quality.
-
Drag the clip to the timeline.
-
Open the Event Pan/Crop controls for this clip. (Either right click on the clip and select Video Event Pan/Crop or select the little Pan/Crop icon on the right side of the clip in the timeline).
-
Make sure the Lock Aspect Ratio button is turned off.
-
In the Width and Height fields under the Position group, type in the exact dimensions of your project – e.g. 1920×1080. Leave all other fields at default values.
-
Now apply UpRez filter to the clip (either as a Event Fx or Media FX or Track FX)
-
In the Source parameter group set the source pixel aspect ratio to match that of the clip’s and set the Source Size to match that of the clip’s also.
-
Click on the disclosure triangle to reveal the Transform parameter group and set the framing pop-up to Fill Frame. The SD image now fills the HD frame.
- Note: It is important to have Sony Vegas Viewer Window in Best/Full Resolution to see the correct result.
Apple Final Cut Pro X Workflow
In FCP X we apply the BCC UpRez filter to an HD sized slug and bring in the SD clip through a well layer:
- Import and SD clip into your event but not into your timeline.
- Add an HD sized solid above the SD clip in the timeline – any generator will do. It should be the same duration as the SD clip.
- Apply Uprez to the solid layer (not to the SD layer).
- Open up the controls for BCC Uprez and click on the Source Layer well to select it.
- Navigate in your project to the SD clip you wish to enlarge and select Apply Clip as you normally would when using well layers in FCP X
- Make sure the Uprez Source settings are correct. By default it assumes the source is 720×480 with 0.9 pixel aspect ratio so adjust this to represent the “true” properties of the original SD source.
- Adjust the framing controls in the Transform group as desired.
- Twirl down the Quality group and select Magic Sharp from the Method pop-up.
- Set the sharpness level to 25 and observe the result, then increase or decrease the sharpness parameter value as necessary.
Apple Motion Workflow
There are two available workflow options for the BCC UpRez filter in Motion 5 depending on which you find more convenient:
- you can apply the clip to an HD solid and bring in the SD clip as a well layer – the Well Layer workflow
or
- you can nest the SD clip in an HD group and apply Uprez to the group – the Nested Sequence workflow
Well Layer Workflow in Motion:
- Create an HD project
- Bring the SD clip into your HD timeline.
- Right click on the SD clip in the timeline and choose Reveal Source Media. Then override the Pixel Aspect Ratio of the source clip to match the pixel aspect ratio of your final HD project, even if that does not accurately match the true pixel aspect ratio of the source clip. This is a counter-intuitive but important step. Uprez needs to do all aspect ratio and size conversion itself in a single pass to achieve the maximum possible quality so you may need to deliberately “lie” to the host and claim the SD clip has a different aspect ratio that it truly does, and this will cause the host to bypass any aspect corrections and let Uprez take care of them internally instead. If you skip this step the framing/cropping will look slightly off in the final result.
- Now add an HD sized solid above the SD clip in the timeline – any generator will do.
- Apply Uprez to the solid layer (not to the SD layer) and open the filter controls in the inspector.
- Make sure the Workflow option in the Uprez filter is set to Well Layer.
- Drag the SD clip into the Source Layer image well.
- Make sure the Uprez Source settings are correct. By default it assumes the source is 720×480 with 0.9 pixel aspect ratio so adjust this to represent the “true” properties of the original SD source.
- Adjust the framing controls in the Transform group as desired.
- Twirl down the Quality group and select Magic Sharp from the Method pop-up.
- Set the sharpness level to 25 and observe the result, then increase or decrease the sharpness parameter value as necessary.
Nested Sequence Workflow in Motion:
- Create an HD project
- Bring the SD clip into your HD timeline.
- Right click on the SD clip in the timeline and choose Reveal Source Media. Then override the Pixel Aspect Ratio of the source clip to match the pixel aspect ratio of your final HD project, even if that does not accurately match the true pixel aspect ratio of the source clip. This is a counter-intuitive but important step. Uprez needs to do all aspect ratio and size conversion itself in a single pass to achieve the maximum possible quality so you may need to deliberately “lie” to the host and claim the SD clip has a different aspect ratio that it truly does, and this will cause the host to bypass any aspect corrections and let Uprez take care of them internally instead. If you skip this step the framing/cropping will look slightly off in the final result.
- Now select the Group that contains the SD clip, open the Inspector tab and then open the Group sub-tab inside the inspector. Set the Fixed Resolution checkbox to ON and make sure the size matches your final HD output size. This effectively nests the SD clip at original resolution in the center of a larger HD frame.
- Apply Uprez to the group which contains the clip, not to the clip itself.
- Open the filter controls in the inspector.
- Make sure the Workflow option in the Uprez filter is set to Nested Sequence.
- Make sure the Uprez Source settings are correct. By default it assumes the source is 720×480 with 0.9 pixel aspect ratio so adjust this to represent the “true” properties of the original SD source.
- Adjust the framing controls in the Transform group as desired.
- Twirl down the Quality group and select Magic Sharp from the Method pop-up.
- Set the sharpness level to 25 and observe the result, then increase or decrease the sharpness parameter value as necessary.
Resolve Workflow
In Resolve, we apply the filter to a node in color mode, but before we can do that we need to disable Resolve’s native scaling Here’s how:
- Create a new empty timeline that matches the dimensions of your final project (for example 4K or HD).
- Import the clip to be uprezzed into the media pool.
- Override Resolve’s native clip scaling. Go to Project Settings —->Image Scaling.
- In both the Input and Output categories, change the dropdown menu to “Center Crop with No Resizing.”
- Drag the clip into the empty timeline. It will appear in the center of the viewer.
- Navigate to the Color panel
- Apply the BCC UpRezas a new node.
- Go to the filter’s effect controls and the Source Pixel Aspect ratio pop-up to match the true pixel aspect ratio of the original clip
- Twirl down the Transform group and select select “Fill Frame (Crop)” from the Framing options pop-up or other framing options as desired.
- Twirl down the Quality group and select Magic Sharp from the Method pop-up
- Set the sharpness level to 25 and observe the result, then increase or decrease the sharpness parameter value as necessary
Boris RED Workflow
-
Note: In Boris RED, BCC UpRez filter needs to be applied above an SD source clip in an HD project.
-
Create an HD project in Boris RED
-
Import the SD size media that is to be uprezzed into the HD timeline
-
The imported SD clip is now centered in the HD frame in the Composite window
-
Note: To ensure maximum quality it is important that the Pixel Aspect Ratio for the media in the RED timeline should be reinterpreted if necessary so that it matches the pixel aspect ratio of the final project, not the pixel aspect ratio of the source material. The true pixel aspect ratio of the source material will be set independently in the Uprez controls.
-
Note: To verify that the pixel aspect ratio of the clip in the timeline matches the final project settings, twirl open the Face track inside the source clip’s track and highlight the “Media” track to open the Movie Media controls in the effect control pane. Make sure the Aspect field is set to either “Use Project Aspect Ratio” or to the specific aspect ratio for your final project.
-
Make sure that no track is selected in the timeline (you can achieve this by clicking anywhere in the gray area outside the tracks in the Timeline window)
-
From Filters menu select BCC UpRez filter from Distortion and Perspective category so that it is applied above (all) the tracks in the timeline
-
Set the true source aspect in the main tab of the Uprez filter with the Source Pixel Aspect Ratio menu
-
Click on the Transform tab in Controls window and select “Fill Frame (Crop)” from the Framing options pop-up or other framing options as desired.
-
Click on the Quality tab in Controls window and select Magic Sharp from the Method pop-up
-
Set the sharpness level to 25 and observe the result, then increase or decrease the sharpness parameter value as necessary